
Dermal Rolling & Stamping Are Now Just a Normal Part of Home Skincare
It’s no longer just celebrities and skincare clinics raving about microneedling — it’s become a trusted, effective part of many women’s home skincare routines, especially for those of us wanting to age gracefully and naturally.
Microneedling, dermal rolling, and dermal stamping may sound like intimidating procedures, but they’re actually simple and effective techniques you can do at home. Let’s break down what they are, how they work, and how to use them safely for glowing, youthful skin.
What Is Microneedling (and How Is It Different from Rolling or Stamping)?
All three methods — microneedling, dermal rolling, and dermal stamping — use tiny needles to create controlled micro-injuries in the skin. This triggers your body’s natural wound healing process, which stimulates collagen and elastin production. Think of it like turning on your skin’s “repair and renew” mode.
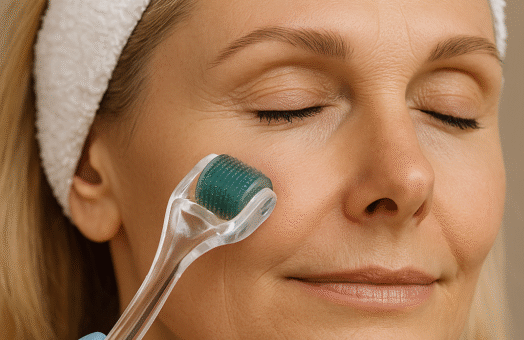
- Dermal Rolling uses a small roller covered in tiny needles. You roll it across the skin in a crisscross pattern.
- Dermal Stamping uses a stamp-like device with needles pressed directly into the skin — it’s more precise and great for spot-treating.
- Microneedling pens (the automated, motorized kind) are often used in clinics but are also now available for at-home use.
Why It’s Become a Normal Part of At-Home Skincare
For women over 50, these tools can make a significant difference in improving skin texture, firmness, and brightness — without resorting to invasive treatments.
Microneedling is:
- Affordable compared to in-clinic treatments
- Safe when done properly
- Effective for softening wrinkles, fading pigmentation, improving scars, and boosting product absorption
Many of us now include dermal rolling or stamping as part of our weekly or monthly skincare routine — just like exfoliating or masking.
How Deep Should You Go? (Understanding Needle Depths)
This is where a lot of confusion (and fear) comes in — but it’s easy once you understand the basics.
| Needle Depth | Use | How Often |
|---|---|---|
| 0.25mm | Boosting product absorption | 2–3x per week |
| 0.5mm | Fine lines, pigmentation, light scarring | 1x per week |
| 1.0mm | Deeper wrinkles, stretch marks, acne scars | 1x every 2–4 weeks |
| 1.5mm+ | Not recommended for home use — best left to professionals |
For home use, stick with 0.25–1.0mm. Always allow skin time to heal between sessions.
What Are the Real Benefits?
- ✨ Plumper, firmer skin
- 💧 Improved absorption of serums and actives
- 🧖♀️ Reduction in fine lines and wrinkles
- 🌟 Brighter, more even tone
- 🩹 Fades acne scars and pigmentation over time
- ⏳ Slows visible signs of aging by encouraging collagen remodeling
And yes, it’s completely normal to see a bit of pinkness or light peeling afterward — that’s a sign your skin is doing the work.
What to Apply During or After Treatment
This is where your skincare products really shine. After rolling or stamping, your skin is in prime condition to soak up active ingredients.
Safe & Effective Topicals to Use:
✅ During or Immediately After (when skin is open):
- Hyaluronic Acid – deeply hydrates
- Copper Peptides – supports healing and collagen
- Stem Cell Serums – boost regeneration
❌ Avoid anything harsh like vitamin C, retinol, or acids right after needling. Save those for a few days later.
✅ A Few Days After (while healing):
- Vitamin C serum – brightens and firms
- Niacinamide – calms and supports the barrier
- Peptides or Growth Factors – maintain results
- Ceramide moisturizers – nourish and protect
Final Thoughts: Gentle but Powerful
Microneedling at home doesn’t need to be scary or painful. With the right tools, technique, and post-care, it becomes a powerful, non-invasive part of your anti-aging routine. Start slowly, choose safe products, and be consistent.
Remember: It’s not about perfection — it’s about helping your skin age with grace, resilience, and a little bit of glow 💖